Thursday, April 30, 2009

Little Garden in the Backyard: Part 1, the bed

UPDATE: Not Michael Landon informs me that the screws we used are 3" #10 wood screws. Apparently that's very important. In case you were about to use dry wall anchors or something. See what I mean about ever the engineer? 

One of the things I was most excited about when we decided to buy a single family home was a vegetable garden. How prairie-like is that?! It's like pre-scratch. Backyard vegetable gardens are coming back in a big way (remember the Obamas are doing it too), they're as local as it gets, and done right can be super healthy and cheap.

Now don't tell Not Michael Landon this, 'cause I'm always trying to defend myself, but I have about the blackest thumb you'll ever meet. A very sad mountain of plants met their demise on the front step and kitchen windowsill of the Little Apartment. I've been helping my mom with her vegetable garden the last several years, and I can't say I've contributed much, even though I have plenty of strong opinions. She's rather happy she gets to do it her own way this year, although I'm pretty sure she misses my manual labor. So I'll be updating you with my progress, and I have all sorts of ideas (including a five year plan), but as my road to good intentions is often paved with spectacular failure, don't hold your breath for a Sunset magazine feature.

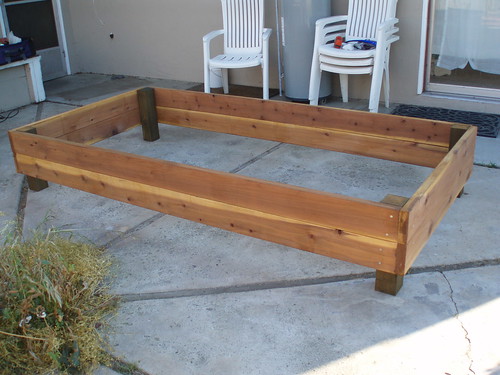
So onto step one - the raised bed. Raised beds are great for drainage, which apparently is important in growing plants or something, and better yet, they require you to bend over just a little bit less. My plans are loosely based on Square Foot Gardening , so I went for a 4 X 8 ft box. This lets me get to all the plants w/o compacting the soil by stepping into the bed and also minimizes the chopping-up of my lawn vs. two 4 X 4 boxes. We already get more veggies than we can eat from the CSA, so this first year I'm focusing on things we can preserve, mostly tomatoes, and starting small. As of right now, the plan is to build an additional box each of the next two years, and wean ourselves off the CSA completely.

We used these instructions from Sunset to plan and build the box. I left out the PVC pipe hoops because I haven't had issue with birds or cold in our area, and I can always attach them to the outside later. Since the materials were not exactly free, we needed a wood that would last awhile in the dirt and rain. Not Michael Landon, ever the engineer, has a tendency to Tim-the-Tool-Man-Taylor any project he's presented with, and as such he really wanted to use pressure treated wood. Despite a good effort in convincing me the nasty chemicals they use these days are not as bad as they used to be, I opted for redwood, which is naturally moisture and rot resistant. We still added nasty chemicals in the form of waterproofing, but at least it's dry to the touch. It wasn't recycled or reclaimed wood or anything like that (Not Michael Landon absolutely refused to use the remnants of our patio cover which are still sitting in a pile waiting for us to pay someone to take them away), but at least it's from California. Hippie home ownership involves all sorts of compromises.

It took almost as long for the two of us to put it together as it did to find someone at the hardware store to cut the boards for us. With waterproofing, it was about two hours total. And that's it up top all pretty (don't pretend you don't have a water heater just hanging out on your back patio, or half-assed curtains that don't reach the floor, and dead weeds all over, I know you're not that hoity toity).

Materials & Cost

First, a note. I have pro-rated all the materials for the various parts of this project, as this is all stuff we will use again, probably even if we never added another box. There is a little more up-front cost than I describe, but these are the true costs. In keeping with true costs, I also included tax. If you do not live where the Governator has just raised sales tax to an arm and a leg, you will see some savings. I have not included the cost of tools, even if we did buy them, as they will be used a billion times in the future - or at least they better be. For this stage, we used a drill and a paintbrush.

6 2" X 6" X 8' redwood boards : $54.14

1 4" X 4" X 8' pressure treated wood post, cut into 16" pieces: $10.89. Okay, okay, I let him talk me into this one. It was half the price of redwood. If this is the toxic influence that kills me, it's a cruel cruel world and I'll be telling God such shortly.

1 gallon Behr waterproofer: $3.05. We used maybe 1/6 of this gallon, this is the price of 1/5. It will last for the next two boxes, as well as an additional coat on the outside of the boxes each year for several years to come.

34 3" screws: $7.33. We used 32 and broke two.

Total: $75.41

Tuesday, April 28, 2009

Brownie Birthday Cake


I couldn't pick Lois out of a lineup, but whoever she is, she's a brownie ninja. In the never-ending war between cakey and fudgy, this brownie takes both trophies. In fact, the tender yet rich consistency and flavor is so perfect, I found myself thinking this is exactly what chocolate cake should be. As a true from-scratch devotee, I cannot describe how much it irks me that it is so impossible to make a chocolate cake from scratch that tastes better than one from a box. Somehow those dehydrated trans fats accomplish a magic grass fed butter and a Kitchen Aide mixer can't recreate. I'm always on the prowl for a chocolate cake recipe to rival a box.

So the next time I had a birthday to cake-bake for, I used a full recipe for each layer and added frosting on top (and in-between). It should only take a quick glance to the truck load of butter and eggs in the recipe below to understand why this was a bad idea. I'm not proud to say it was the first time in my life I've met chocolate that was too rich. I think next time around I might just frost one recipe, or possibly split the one recipe into layers. Lesson: do not let your need to one-up Sarah Lee talk you into putting 8 eggs into one cake.

Whatever kind of cake you make, please, for the love of God, never frost it out of a can. If you only make one thing from scratch, chocolate frosting should be it. It takes no time at all and is about fifty billion times better than the crap you can buy off the shelf.

Lois's Brownies

Ingredients
4 oz unsweetened chocolate
2 c sugar
2/3 c unsalted butter
1 c flour
1 tsp salt
2 tsp vanilla
4 eggs

Directions
1. Melt the butter and chocolate in a double boiler. Use a large bowl and suspend it over a fairly shallow pan of simmering water. Don't completely cover the pan with the bowl, or the pressure will increase the temperature too much. Be careful that no water gets in the bowl. Basically this means hold onto the bowl and don't go starting the rest of the recipe. Melting chocolate is a fairly simple method that pays dividends in taste, all it requires is vigilance.
2. Take bowl off heat and add sugar, then eggs and vanilla. Mix well.
3. Add dry ingredients.
4. Pour into greased 8"x8" pan and bake at 325 for 30 minutes.

Homemade Chocolate Frosting

Ingredients
1 lb powdered sugar
1/4 c or more cocoa powder
2 tbsp milk or coffee, plus some more

Directions
1. Mix powdered sugar and cocoa powder. Add as much cocoa powder as looks good, it will get slightly darker with the liquid.
2. Add milk or coffee very slowly; mix thoroughly and test texture before adding more. The sugar will dissolve into the liquid and come together, but the point where it becomes too liquid is very fine. If you go too far, you can just add more powdered sugar and/or cocoa, but it will be more than you think. Coffee just enhances the chocolate flavor, rather than tasting like coffee; milk will have more of a milk chocolate taste.


Friday, March 20, 2009

Little White House in DC

The Obamas are starting a veggie garden, just like Michael Pollan suggested they do in his open letter to the then-undetermined next farmer-in-chief. Lest one think they're dabbling, it's nearly the square footage of my house. And they're even making honey. 

That's it - I need a staff. 

Tuesday, March 17, 2009

Veggie Time


After a long four month hiatus, my CSA starts again this week. Not a moment too soon. I hadn't had a cold from February through December, and then after Christmas I got hit by three in a row. There's no doubt our diet suffers when veggies aren't automatically bulging out of our fridge. 

One of the things I really want to work on this year is using and preserving as much of the bounty as possible. We threw away far too much last year, and had hardly anything saved for the winter. The box we get is really too big for two, so this is quite the challenge. The start of the CSA season also coincides with energy-draining allergy season, so finding extra time and energy to chop and freeze is quite the tall task, but all I can do is try. 

This all starts with planning. I get an email on Mondays with a rough idea of what's coming on Wednesday, so I can get a head start. On tap this week: 

Green garlic
Red beets
Savoy cabbage
Parsnips 
Braising mix/cooking greens or mystery
Red Chard
Parisian Round carrots
Mystery
Curly parsley

The root vegetables will be easy. Beets, carrots, and parsnips I can chop up and roast in the oven alongside some pork chops or other meat. Parsnips are very similar to potatoes in a lot of ways, so I can mash some for another meal. All three are also nice additions to a salad when sliced very thin. 

The greens are the toughest for us. Neither not Michael Landon, nor I like cooked greens, which is normally a great way to get rid of a box full of greens like this quickly. Without all the water cooked out, these greens seem to multiply. None of them are really salad greens, but we've found their bitterness doesn't take over when paired with some other salad-friendly lettuce and a good vinegrette. I can tolerate cooked greens mixed in with other things, so I may blanch some of them to use in a quiche or other baked dish I can take to lunch as leftovers. 

Curly parsley is kind of a mistake on the farm's part, and not something I normally use, but my parsley jar is looking really sad, so I'll dry this in the oven and use for many months. Spring garlic will be used in almost everything, but there's still a ton in a bunch. I may need to see about drying or freezing it next week or so. 

We're tasked with a salad for 7 or 8 people at a pot-luck on Thursday. Pot-lucks are how I use up a lot of our CSA leftovers, so I'm always happy to bring something. 

We also need to get our compost pile going since these veggies come a little more "from the earth" than you see at the grocery store. 

Update next week with our results and more veggies. Happy spring! 

Saturday, March 7, 2009

Pumpkin Pie from Pumpkins

My flowers are budding, birds are flying North, and my dog is shedding. Spring has sprung, but I gave up sweets for Lent, so allow me to reminisce a bit about fall treats.

The kicker to this pie is it's not made from a can, but any good pie starts with the crust. Now, I know everyone thinks their grandmother makes the best pie crust, but unless your my cousin on my mother's side (hi), you're wrong. I'm going to immortalize her recipe here on the interwebs, and it's a good part of what makes it so great - it's got twice the fat of any recipe I've seen - but there's something magic about the technique that no one has quite mastered, so she's safe as pie queen for now.

The pumpkin part isn't as much work as it sounds. It just roasts in the oven, and then you scoop it out. Joy has all these elaborate instructions about getting it to the consistency of canned, but I didn't look at them until I had mixed in the eggs and cream, so I found out a stick blender works like a charm. A regular blender will suffice just as with butternut squash soup, it's just messier.

A friend we served this to was convinced there was some kind of secret spice, the pumpkin flavor is so rich. The cream also gives it a richer texture as opposed to evaporated milk, without loosing its firmness. Sugar pie pumpkins - which are small, round, and more orange - are ideal, but any variety will do. I had a lot of the smaller flat Halloween pumpkins lying around. Just add sugar to taste, tasting as minimally as possible (lots of raw egg).

Grandma's Pie Crust

This makes two crusts, enough for a covered pie like apple. Cut in half for pumpkin.

Ingredients
1 1/2 cups flour
1 tsp salt
1/3 cup cold butter
2/3 cup shortening
1/3 cup ice water

Directions
1. Everything works better cold. Start with a cold bowl.
2. Whisk flour & salt.
3. Cut butter & shortening into small pieces - I like to shave of teaspoons or so with a butter knife right into the bowl.
4. Cut butter & shortening into flour with two butter knives or a pastry blender until consistency reaches course meal (see picture on the left).
5. Pour ice water in and mix by hand until just stuck together. You probably can't tell in this picture on the right, but there's little pockets of butter & shortening that will create the flaky layers when baked.
6. Cover & refrigerate at least one hour until firm.
7. Roll out onto as lightly floured a surface as you can manage.
8. Fold rolled out crust over on itself once or twice to transfer to a greased pie plate without looking like a dog has chewed on it. I haven't mastered this part yet. Luckily it's forgiving, you can stretch and piece together the crust with your fingers once it's in the plate.

Pumpkin Pie
adapted from Joy

Ingredients
2 1/2 to 3 lbs pumpkin
Canola oil
2 large eggs, plus one large yolk
1 1/2 cups heavy cream (reserve remaining 1/2 cup of pint for whipping)
1/2 cup sugar
1/3 cup packed brown sugar
1 tsp ground cinnamon
1 tsp ground ginger
1/2 tsp grated or ground nutmeg
1/4 tsp ground cloves
1/2 tsp salt, plus a few dashes

Directions
1. Wash pumpkins and cut in half whichever way makes them flattest. Pop off the stems, scoop out flesh & seeds. Salt and drizzle open sides with canola oil. Oil a roasting pan, place pumpkins on it rind side down, and cover with aluminum foil.
2. Bake at 325F until very soft, as long as 1 1/2 hours. Check often with a spoon. Rinse scooped out seeds, toss with oil & salt, and bake on a separate rack for a few minutes to snack on while finishing your pie.
3. Set oven temperature to 425F. Scrape flesh free of rinds and scoop into large bowl or blender. Add cream and two eggs; blend (in blender or with stick blender) until smooth.
4. Whisk or blend in remaining ingredients thoroughly.
5. Glaze and blind bake the crust: brush with remaining egg yolk. Somehow bake & brown crust without letting it bubble up too much. I haven't quite mastered this yet, but I think the key is a well-greased empty pie plate set inside the crust. Bake for 8-10 minutes, take out empty pie plate and bake another 3-5 minutes until brown. Decrease oven to 375F.
6. Pour custard into baked crust and bake 35 to 45 minutes until firm.
7. Cool completely, best served cold with fresh whipped cream on top.

Wednesday, February 25, 2009

On how to survive the apocalypse

I'm back. Christmas'ed, house bought, dog adopted, moved in, and unpacked enough for my camera to start surrendering some of what I've made these last three months. But it's not a whole lot, being that all of this activity wasn't particularly condusive to homemade meals. Apocalyptic is quite the hyperbole for the wonderful occasion of buying a house (I expected to be really proud, but mostly I felt insanely lucky, especially at this particular moment in history), but when we're talking about home cooked, whole, real, sustainable food, it's pretty apt. 

All in all I think we've done pretty well. Taco Bell and Round Table are now right down the street, and we said our long goodbyes to the Taqueria and Chinese joint around the corner from the little apartment, but I don't feel like we regressed at all down our path away from eating out. 

Here's a little of how we did it: 

1) Trader Joe's, thy name is savior. Cheap, minimally processed, convenience food. Need I say more? We dropped a good c note there when we got really frazzled and ate off it for a month. 

2) Food Processor Pasta: Put salted water on to boil. Whiz up an onion and some garlic in a food processor, dump into a skillet with a little olive oil. Open a big can of tomatoes and whiz 'em up in the same unwashed food processor bowl (skip this step if your husband and/or kids don't have an aversion to cooked chunks of tomato). When the water boils, toss in the pasta. When the onion is soft, toss in the tomato. When the pasta's done, toss it in the sauce.

Done. In like 15 minutes. Portion it all out into individual tupperware and eat for lunch and dinner for a week. 

3) Clementines and baby carrots. Or any other ready-to-eat anytime fruits & veggies. A good vegetable side or salad is the first thing to go when home cooking slacks off. We've often reminded each other to grab a clementine to prevent scurvy. We're mostly joking. 

4) Forget what "dinner" looks like. Cheese, crackers, hummus, naan and baby carrots gets the job done. 

5) Keep a loaf of bread and a jar each of peanut butter and jelly at your office if you can. If you can't get dinner on the table, what's the chances your making your own lunch? It takes me less time to whip up a sandwich than it would to go grab something. 

6) Have an awesome mom who brings you a full home cooked meal with leftovers when she thinks you've been TacoBelling-it too much. This one's a little tough to control, but do what you can. And thanks, mom. 

Saturday, January 10, 2009

Navy Bean Soup

My grandfather was pretty much famous for this soup. It's legendary. Of course, he's been gone for over 15 years now and no one ever got the recipe. I was only 10 when he died, so I don't even remember the soup first hand, which makes it awfully difficult to replicate. I eventually adapted a recipe from Joy called US Senate Bean soup, which apparently has been served in the US Senate cafeteria for eleventy billion years, and can be made with navy or other like beans.

Why did I try? Well, it's what I like to call mortgage food - dirt cheap, therefore leaving money to pay the mortgage. While I'm trying out more mortgage food these days because I'll soon have one for the first time, the headlines tell me there's plenty of people out there who could use it these days. This is basically beans and potatoes, flavored with some cheap fat. Slow cooked, the beans almost totally disintegrate and it gets really creamy. Right out of the pot, it's okay, but the leftovers get better every day as the ham flavor takes over.

It's amazing how far away we've gotten from food like this that used to be so commonplace. First of all, I learned that navy beans are not navy at all. They're actually white, but they were popular food for the US Navy once upon a time, mortgage food being a great way to feed a crowd on the taxpayers' dime and all. Secondly, I learned what a ham hock is. In case you haven't come across one, and you end up staring at the butcher a little doe-eyed when he tells you they're in the self-serve case, and then try your best to look like you know what you're doing while you paw through a bunch of different meat products which may or may not be what you're looking for, this little package on the right is a ham hock. It's a piggy knee joint.

This makes a ton, we had dinner one night and 6-8 servings leftover. Feel free to cut in half if you don't want to be eating it for a week or are more particular about food safety than I am.

Ingredients
  • 2-3 ham hocks
  • 1 bag dried navy beans
  • 1 large onion (we had leeks around, so we used those)
  • 6 medium celery ribs with leaves, chopped
  • 2 large potatoes, peeled and finely diced
  • 4 garlic cloves, minced
Directions
  1. Soak the beans overnight, at least.
  2. Turn the slow cooker on high and throw in the ham hocks to get the fat flowin'. (You could also do this on the stove top if you don't have a slow cooker around.)
  3. Drain the beans, toss them in the slow cooker, and cover with cold water. I used less than half the water the recipe called for, mostly because it wouldn't all fit in my slow cooker, and I still think it was a bit watery. Just make sure there's enough for everything to cook in.
  4. Turn the heat down to low and go to work.
  5. (When I got home, I transferred everything into a stock pot to add the veggies, mostly for room and also the higher temperature. You could probably accomplish the next step on high in a slow cooker if you'd halved the recipe.) Take out the ham hock and pick off any meat; discard bone, fat and skin, although you should know that makes up most of a ham hock. Chop up the veggies and toss in, add salt & pepper to taste.
  6. Simmer a half hour or so until the potatoes are really soft. Mash with a potato masher if that looks practical, I just served it as is. Most everything was mush already.
  7. Serve with toasted sourdough bread, bonus points if it's garlic. Dip the bread in the soup for a little taste of (inexpensive) heaven.