Monday, May 18, 2009

Little Garden in the Backyard: Part 3 - the plants

You mean we're actually growing things here? Amazingly enough all that prep work eventually leads us to real live plants. Growing from seed has its advantages - it's by far the least expensive method and gives you complete control throughout the life cycle. My five year plan definitely involves starting my own seeds, and maybe even harvesting my own for some varieties, but we're starting small here remember. Buying seedlings is far more foolproof. 

And here's where I get to pimp my local Master Gardeners. I'll let them explain who the heck they are for themselves, from the American Horticultural Society website where you can find your own local program: 
The Master Gardener program, conducted throughout the United States and Canada, is a two-part educational effort, in which avid gardeners are provided many hours of intense home horticulture training, and in return they "pay back" local university extension agents through volunteerism. Master Gardeners assist with garden lectures, exhibits, demonstrations, school and community gardening, phone diagnostic service, research, and many other projects.
I get a monthly e-newsletter from my local Master Gardeners program with all kinds of tips and tricks, and a schedule of workshops and classes which are mostly free. But by far the best thing they do is their annual plant sale. The seedlings are $3 each, which is a decent price to start with, and the proceeds all go back into the MG program. There are all kinds of different fun varieties available, the MGs themselves swarm the place with advice and answers, there are other vendors with all kinds of neat plants & garden products, and the day is filled with seminars and demos and more knowledge than you could hope to absorb. 

Tomatoes and peppers especially don't like cold ground, so I kept these seedlings right up next to the house for the couple weeks they were home, and brought them in the garage the couple nights we got near frost. I checked their moisture level nearly daily as they can dry up quickly with their small size, and watered them more than once a day during our heat wave of 90 degree + temps (Yes, the frost and record highs were within two weeks of each other. While I'm making baby steps, global climate change is catching up). They hung on bravely, but started loosing their patience. 

The whole idea of Square Foot Gardening is to plant things in square feet, instead of rows - it's a very complicated fancy name. If a plant is to be spaced 12" apart in a row, you would instead plant one in every square foot. If the spacing is 6" apart, you would plant 4 per square foot, and so on and so forth. Indeterminate (viney) tomatoes can be planted one per square foot; determinate (bushy, the kind you can grow in containers) one per 2 square ft. 

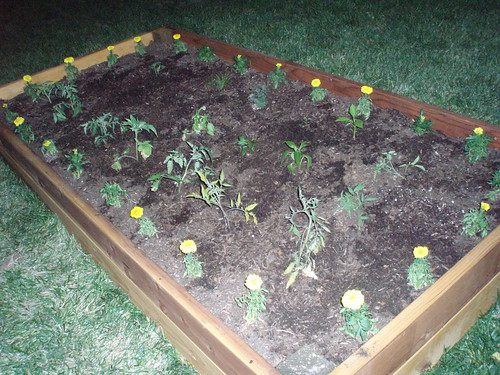
So, you're supposed to lay down this grid of wood or twine or something so you know where these square feet are, but did you see my pretty stained redwood box?! Well check this out - marigolds are an organic gardener's best friend. The yellow flowers are a natural repellent to all kinds of bugs, and they make a pretty little border. By planting a marigold every 12" around the border of my bed, I can roughly eyeball a square foot grid. Two birds, meet this one stone. Brilliant. You might notice in the picture at top that I couldn't bring myself to actually line everything up with the marigolds in exact square feet. It just looked so crowded, I couldn't imagine picking tomatoes off the grown vines. It's pretty close though; baby steps.

As for the actual planting, I did nothing fancy. I've got plenty of fertility in the soil, none needed in each hole. I just broke up the roots a bit and stuck 'em in. Tomatoes can use as many roots as they can get, and don't actually need much leaves, so I plant them deep, as much as 2/3 of the stem underground. Prick off the leaves you're burying and those stems will turn into especially nutrient-grabby roots. This picture is rather horrible (taking photos of dirt on dirt in the fading light isn't as easy as it sounds), but gives you a general idea. 

When it warms up some more, I'll be mulching the whole bed with a few inches of extra compost, but for now I dare say we're done. Time to sit back and wait for late summer magic. 

Seedlings: 
Tomatoes: I went for a wide variety here, but heavy on paste tomatoes that can be canned
    Paste - Sunset's Red Horizon (2), Mamma Mia (2)
    Beefsteak - Ernie's Round, Mariana's Peace
    Strawberry - Orange Russian
    Cherry - Sugary
    Green - Spear's Tennesse Green
Peppers: Gypsys are smaller and thinner than bells, the hot peppers will be used for salsa
    Sweet - Gypsy (2)
    Hot - Anaheim, Serrano
Lemon cucumbers: cute and yummy and fantastic for snacking, salads, or pickling
Herbs: 
    Sweet basil
    Cilantro
    Garlic chives
    Italian oregano: after planting I figured out this is a perennial; it may move to the flower beds in the fall

Materials & Cost

Planting took about one hour, and involved only a trowel. Most of the peppers and tomatoes were purchased at the Master Gardener's sale, and a lot of the rest was purchased from other vendors at the event. I picked up a couple things elsewhere and even got a couple tomatoes as gifts, but my rough total is $45.00 plus $11.00 for marigolds (I'd file this as pest control rather than seedlings). I'm not proud to say a number of seedlings fell victim to my black thumb just waiting to be planted; the cilantro that made it into the ground was no less than my third. This is an additional dimwit cost of about $16.00, and a recurring theme I need to get a handle on (you may remember tomato canning involved a similar dimwit fee, when I got so burnt out I never got around to preserving the peppers and basil I had bought as well). Remember seedlings are the only real recurring cost of the whole project, so I have to harvest about 23 lbs to break even assuming an average farmer's market price of $2/lb for local, organic produce. Stay tuned. 

Friday, May 15, 2009

Little Garden in the Backyard: Part 2 - the soil

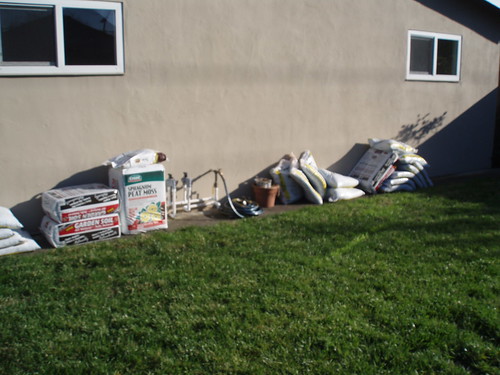
That's a whole ton of sh_t. Almost literally, really, the picture above is all the soil we bought for the vegetable garden, and it's mostly steer manure. If I can't grow something in this stuff, there is truly no hope for me. We used roughly equal parts garden soil and steer manure compost, and another half part peat moss. Square Foot Gardening recommends 1/3 compost, 1/3 peat moss and 1/3 vermiculite. Whatever vermiculite is, they didn't have it at OSH and I was in a hurry as usual. We even added in a little all-purpose organic fertilizer to the top layer.

Another plus to the raised bed, and a rather tall one at 12", is we don't have to worry about weeds or grass, especially crab grass, encroaching on the garden space. I did a flat bed with my mom's garden and we ended up digging a trench around and installing a wood border, this on top of all the digging we did to clear the bed in the first place. With this raised bed, we dug up about one whole square foot - just enough for the four posts to sit in the ground. We left the rest of the grass, it won't grow through 10" of soil, and will eventually break down to become nutrients for the veggies. The only drawback is I can't yet grow something with really deep roots like carrots, at least not yet.


We layered the ingredients in thirds and raked/mixed after each addition to make sure everything was well-incorporated. The end result is a porous, aerated, uber-nutrient-rich blank canvas ready to make yumminess. We got a late start, so we left planting the seedlings for another day, this gave the soil a chance to get some water and settle. For now we're watering it with the sprinkler right behind it in the corner there, but I won't want the tomatoes watered as often as the lawn once they really get going, so we'll have to figure something out.

Now before I break down the costs, I have to share one last tip, and beg you to forgive the little woman nature of it. Growing up without a man in the house, there is a certain handiness to Not Michael Landon that continues to amaze me, five years after moving in together. When mom and I used bags of steer manure compost, we'd open them up potato-chip-bag style, usually with whatever was lying around like a trowel or a rake or just tear at them with our hands until they finally gave in. Then we'd flip them over and attempt to distribute each bag evenly over the entirety of the 8'X8' bed, which mostly resulted in the momentum of the bag swinging us around until the majority was in a big clump in one corner, and the rest scattered a bit here and there.

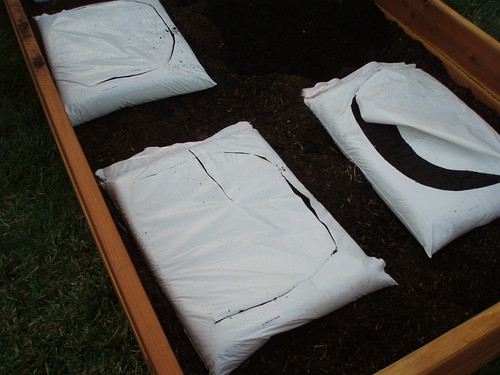
So imagine my wonder when Not Michael Landon evenly sets out six bags of compost in our garden bed, makes a big open U-shape on each with a utility knife, and dumps each over in its place, resulting in a nearly even layer of compost with almost no effort at all. I was speechless. He wondered how I hadn't died off on my own already. You're probably too smart to be as amazed as I was, but here's a picture just for funsies.

With digging the holes, dumping everything in, turning and raking, this stage took all of about an hour. We bought a lot more soil components than we needed, but it will all get used eventually, in the next bed if not in other places around the yards.

Materials & Cost

This was all on a no sales tax sale, whoopee! Tools used were a spade, large shovel, and small rake.

Steer manure blend: 12 cu feet, 12 bags at $1.09 each = $13.08

Garden soil: 10 cu feet, 3 1/3 bags at $8.99 each = $29.97

Sphagnum peat moss: 2.5 cu feet compressed, 2/3 bag at $15.49 each = $10.33

All purpose organic fertilizer: 3.5 cups of 20lb bag at $19.99 = $1.17

Total: $54.55

The box and the soil are really the start up costs of this garden. Next year will involve some added compost, fertilizer, and seedlings, but this soil and box will be used again. So the sum total for the installation itself is $129.96 and 6 man hours of labor. 

Thursday, April 30, 2009

Little Garden in the Backyard: Part 1, the bed

UPDATE: Not Michael Landon informs me that the screws we used are 3" #10 wood screws. Apparently that's very important. In case you were about to use dry wall anchors or something. See what I mean about ever the engineer? 

One of the things I was most excited about when we decided to buy a single family home was a vegetable garden. How prairie-like is that?! It's like pre-scratch. Backyard vegetable gardens are coming back in a big way (remember the Obamas are doing it too), they're as local as it gets, and done right can be super healthy and cheap.

Now don't tell Not Michael Landon this, 'cause I'm always trying to defend myself, but I have about the blackest thumb you'll ever meet. A very sad mountain of plants met their demise on the front step and kitchen windowsill of the Little Apartment. I've been helping my mom with her vegetable garden the last several years, and I can't say I've contributed much, even though I have plenty of strong opinions. She's rather happy she gets to do it her own way this year, although I'm pretty sure she misses my manual labor. So I'll be updating you with my progress, and I have all sorts of ideas (including a five year plan), but as my road to good intentions is often paved with spectacular failure, don't hold your breath for a Sunset magazine feature.

So onto step one - the raised bed. Raised beds are great for drainage, which apparently is important in growing plants or something, and better yet, they require you to bend over just a little bit less. My plans are loosely based on Square Foot Gardening , so I went for a 4 X 8 ft box. This lets me get to all the plants w/o compacting the soil by stepping into the bed and also minimizes the chopping-up of my lawn vs. two 4 X 4 boxes. We already get more veggies than we can eat from the CSA, so this first year I'm focusing on things we can preserve, mostly tomatoes, and starting small. As of right now, the plan is to build an additional box each of the next two years, and wean ourselves off the CSA completely.

We used these instructions from Sunset to plan and build the box. I left out the PVC pipe hoops because I haven't had issue with birds or cold in our area, and I can always attach them to the outside later. Since the materials were not exactly free, we needed a wood that would last awhile in the dirt and rain. Not Michael Landon, ever the engineer, has a tendency to Tim-the-Tool-Man-Taylor any project he's presented with, and as such he really wanted to use pressure treated wood. Despite a good effort in convincing me the nasty chemicals they use these days are not as bad as they used to be, I opted for redwood, which is naturally moisture and rot resistant. We still added nasty chemicals in the form of waterproofing, but at least it's dry to the touch. It wasn't recycled or reclaimed wood or anything like that (Not Michael Landon absolutely refused to use the remnants of our patio cover which are still sitting in a pile waiting for us to pay someone to take them away), but at least it's from California. Hippie home ownership involves all sorts of compromises.

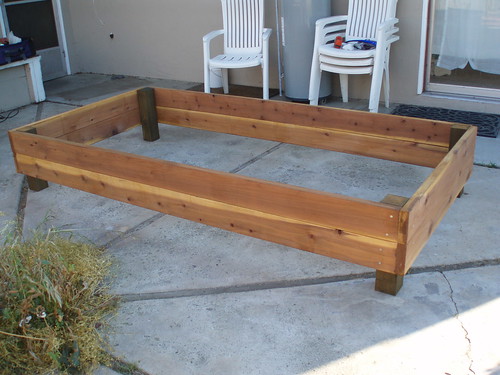
It took almost as long for the two of us to put it together as it did to find someone at the hardware store to cut the boards for us. With waterproofing, it was about two hours total. And that's it up top all pretty (don't pretend you don't have a water heater just hanging out on your back patio, or half-assed curtains that don't reach the floor, and dead weeds all over, I know you're not that hoity toity).

Materials & Cost

First, a note. I have pro-rated all the materials for the various parts of this project, as this is all stuff we will use again, probably even if we never added another box. There is a little more up-front cost than I describe, but these are the true costs. In keeping with true costs, I also included tax. If you do not live where the Governator has just raised sales tax to an arm and a leg, you will see some savings. I have not included the cost of tools, even if we did buy them, as they will be used a billion times in the future - or at least they better be. For this stage, we used a drill and a paintbrush.

6 2" X 6" X 8' redwood boards : $54.14

1 4" X 4" X 8' pressure treated wood post, cut into 16" pieces: $10.89. Okay, okay, I let him talk me into this one. It was half the price of redwood. If this is the toxic influence that kills me, it's a cruel cruel world and I'll be telling God such shortly.

1 gallon Behr waterproofer: $3.05. We used maybe 1/6 of this gallon, this is the price of 1/5. It will last for the next two boxes, as well as an additional coat on the outside of the boxes each year for several years to come.

34 3" screws: $7.33. We used 32 and broke two.

Total: $75.41

Tuesday, April 28, 2009

Brownie Birthday Cake


I couldn't pick Lois out of a lineup, but whoever she is, she's a brownie ninja. In the never-ending war between cakey and fudgy, this brownie takes both trophies. In fact, the tender yet rich consistency and flavor is so perfect, I found myself thinking this is exactly what chocolate cake should be. As a true from-scratch devotee, I cannot describe how much it irks me that it is so impossible to make a chocolate cake from scratch that tastes better than one from a box. Somehow those dehydrated trans fats accomplish a magic grass fed butter and a Kitchen Aide mixer can't recreate. I'm always on the prowl for a chocolate cake recipe to rival a box.

So the next time I had a birthday to cake-bake for, I used a full recipe for each layer and added frosting on top (and in-between). It should only take a quick glance to the truck load of butter and eggs in the recipe below to understand why this was a bad idea. I'm not proud to say it was the first time in my life I've met chocolate that was too rich. I think next time around I might just frost one recipe, or possibly split the one recipe into layers. Lesson: do not let your need to one-up Sarah Lee talk you into putting 8 eggs into one cake.

Whatever kind of cake you make, please, for the love of God, never frost it out of a can. If you only make one thing from scratch, chocolate frosting should be it. It takes no time at all and is about fifty billion times better than the crap you can buy off the shelf.

Lois's Brownies

Ingredients
4 oz unsweetened chocolate
2 c sugar
2/3 c unsalted butter
1 c flour
1 tsp salt
2 tsp vanilla
4 eggs

Directions
1. Melt the butter and chocolate in a double boiler. Use a large bowl and suspend it over a fairly shallow pan of simmering water. Don't completely cover the pan with the bowl, or the pressure will increase the temperature too much. Be careful that no water gets in the bowl. Basically this means hold onto the bowl and don't go starting the rest of the recipe. Melting chocolate is a fairly simple method that pays dividends in taste, all it requires is vigilance.
2. Take bowl off heat and add sugar, then eggs and vanilla. Mix well.
3. Add dry ingredients.
4. Pour into greased 8"x8" pan and bake at 325 for 30 minutes.

Homemade Chocolate Frosting

Ingredients
1 lb powdered sugar
1/4 c or more cocoa powder
2 tbsp milk or coffee, plus some more

Directions
1. Mix powdered sugar and cocoa powder. Add as much cocoa powder as looks good, it will get slightly darker with the liquid.
2. Add milk or coffee very slowly; mix thoroughly and test texture before adding more. The sugar will dissolve into the liquid and come together, but the point where it becomes too liquid is very fine. If you go too far, you can just add more powdered sugar and/or cocoa, but it will be more than you think. Coffee just enhances the chocolate flavor, rather than tasting like coffee; milk will have more of a milk chocolate taste.


Friday, March 20, 2009

Little White House in DC

The Obamas are starting a veggie garden, just like Michael Pollan suggested they do in his open letter to the then-undetermined next farmer-in-chief. Lest one think they're dabbling, it's nearly the square footage of my house. And they're even making honey. 

That's it - I need a staff. 

Tuesday, March 17, 2009

Veggie Time


After a long four month hiatus, my CSA starts again this week. Not a moment too soon. I hadn't had a cold from February through December, and then after Christmas I got hit by three in a row. There's no doubt our diet suffers when veggies aren't automatically bulging out of our fridge. 

One of the things I really want to work on this year is using and preserving as much of the bounty as possible. We threw away far too much last year, and had hardly anything saved for the winter. The box we get is really too big for two, so this is quite the challenge. The start of the CSA season also coincides with energy-draining allergy season, so finding extra time and energy to chop and freeze is quite the tall task, but all I can do is try. 

This all starts with planning. I get an email on Mondays with a rough idea of what's coming on Wednesday, so I can get a head start. On tap this week: 

Green garlic
Red beets
Savoy cabbage
Parsnips 
Braising mix/cooking greens or mystery
Red Chard
Parisian Round carrots
Mystery
Curly parsley

The root vegetables will be easy. Beets, carrots, and parsnips I can chop up and roast in the oven alongside some pork chops or other meat. Parsnips are very similar to potatoes in a lot of ways, so I can mash some for another meal. All three are also nice additions to a salad when sliced very thin. 

The greens are the toughest for us. Neither not Michael Landon, nor I like cooked greens, which is normally a great way to get rid of a box full of greens like this quickly. Without all the water cooked out, these greens seem to multiply. None of them are really salad greens, but we've found their bitterness doesn't take over when paired with some other salad-friendly lettuce and a good vinegrette. I can tolerate cooked greens mixed in with other things, so I may blanch some of them to use in a quiche or other baked dish I can take to lunch as leftovers. 

Curly parsley is kind of a mistake on the farm's part, and not something I normally use, but my parsley jar is looking really sad, so I'll dry this in the oven and use for many months. Spring garlic will be used in almost everything, but there's still a ton in a bunch. I may need to see about drying or freezing it next week or so. 

We're tasked with a salad for 7 or 8 people at a pot-luck on Thursday. Pot-lucks are how I use up a lot of our CSA leftovers, so I'm always happy to bring something. 

We also need to get our compost pile going since these veggies come a little more "from the earth" than you see at the grocery store. 

Update next week with our results and more veggies. Happy spring! 

Saturday, March 7, 2009

Pumpkin Pie from Pumpkins

My flowers are budding, birds are flying North, and my dog is shedding. Spring has sprung, but I gave up sweets for Lent, so allow me to reminisce a bit about fall treats.

The kicker to this pie is it's not made from a can, but any good pie starts with the crust. Now, I know everyone thinks their grandmother makes the best pie crust, but unless your my cousin on my mother's side (hi), you're wrong. I'm going to immortalize her recipe here on the interwebs, and it's a good part of what makes it so great - it's got twice the fat of any recipe I've seen - but there's something magic about the technique that no one has quite mastered, so she's safe as pie queen for now.

The pumpkin part isn't as much work as it sounds. It just roasts in the oven, and then you scoop it out. Joy has all these elaborate instructions about getting it to the consistency of canned, but I didn't look at them until I had mixed in the eggs and cream, so I found out a stick blender works like a charm. A regular blender will suffice just as with butternut squash soup, it's just messier.

A friend we served this to was convinced there was some kind of secret spice, the pumpkin flavor is so rich. The cream also gives it a richer texture as opposed to evaporated milk, without loosing its firmness. Sugar pie pumpkins - which are small, round, and more orange - are ideal, but any variety will do. I had a lot of the smaller flat Halloween pumpkins lying around. Just add sugar to taste, tasting as minimally as possible (lots of raw egg).

Grandma's Pie Crust

This makes two crusts, enough for a covered pie like apple. Cut in half for pumpkin.

Ingredients
1 1/2 cups flour
1 tsp salt
1/3 cup cold butter
2/3 cup shortening
1/3 cup ice water

Directions
1. Everything works better cold. Start with a cold bowl.
2. Whisk flour & salt.
3. Cut butter & shortening into small pieces - I like to shave of teaspoons or so with a butter knife right into the bowl.
4. Cut butter & shortening into flour with two butter knives or a pastry blender until consistency reaches course meal (see picture on the left).
5. Pour ice water in and mix by hand until just stuck together. You probably can't tell in this picture on the right, but there's little pockets of butter & shortening that will create the flaky layers when baked.
6. Cover & refrigerate at least one hour until firm.
7. Roll out onto as lightly floured a surface as you can manage.
8. Fold rolled out crust over on itself once or twice to transfer to a greased pie plate without looking like a dog has chewed on it. I haven't mastered this part yet. Luckily it's forgiving, you can stretch and piece together the crust with your fingers once it's in the plate.

Pumpkin Pie
adapted from Joy

Ingredients
2 1/2 to 3 lbs pumpkin
Canola oil
2 large eggs, plus one large yolk
1 1/2 cups heavy cream (reserve remaining 1/2 cup of pint for whipping)
1/2 cup sugar
1/3 cup packed brown sugar
1 tsp ground cinnamon
1 tsp ground ginger
1/2 tsp grated or ground nutmeg
1/4 tsp ground cloves
1/2 tsp salt, plus a few dashes

Directions
1. Wash pumpkins and cut in half whichever way makes them flattest. Pop off the stems, scoop out flesh & seeds. Salt and drizzle open sides with canola oil. Oil a roasting pan, place pumpkins on it rind side down, and cover with aluminum foil.
2. Bake at 325F until very soft, as long as 1 1/2 hours. Check often with a spoon. Rinse scooped out seeds, toss with oil & salt, and bake on a separate rack for a few minutes to snack on while finishing your pie.
3. Set oven temperature to 425F. Scrape flesh free of rinds and scoop into large bowl or blender. Add cream and two eggs; blend (in blender or with stick blender) until smooth.
4. Whisk or blend in remaining ingredients thoroughly.
5. Glaze and blind bake the crust: brush with remaining egg yolk. Somehow bake & brown crust without letting it bubble up too much. I haven't quite mastered this yet, but I think the key is a well-greased empty pie plate set inside the crust. Bake for 8-10 minutes, take out empty pie plate and bake another 3-5 minutes until brown. Decrease oven to 375F.
6. Pour custard into baked crust and bake 35 to 45 minutes until firm.
7. Cool completely, best served cold with fresh whipped cream on top.