Thursday, September 30, 2010

Pasta for when I don't have time

As opposed to hours on a Sunday, this one was 20 minutes on a weekday morning.

I made entirely too much filling for the raviolis, and you can't throw out that much cheesy goodness. Not Michael Landon joked that he wanted a homemade lasagna with the leftovers (he has an odd sense of humor), but I had already decided that was exactly what I wanted to do. And ricotta with raw egg couldn't exactly wait for another day off.

So to abbreviate the rest of the process, I skipped meat - I had enough cheese to make the American Heart Association sufficiently appalled in its absence. Also, the lasagna noodles, which don't sound like work until you're on your way home and really don't feel like stopping by the grocery store in shoes that need to come off two hours ago, and can be just as easily replaced with dried rotini.

While the water came to a boil (always with a lid on! takes half the time), I chopped up the leftover onion and garlic from my grilled tomato sauce in the food pro, and mixed those up with what little of that sauce was left over, a can of crushed tomatoes, more basil pesto, and more of my usual seasonings. Pulled the ravioli filling out of the fridge, grated a bunch of mozzarella, parm, romano and asiago. When in doubt, more cheese.

I layered sauce, mostly-cooked pasta, ricotta/filling and cheese, a few times until the top, finishing with sauce, grated cheeses, a little dusting of bread crumbs, and a little butter dabbed on top.

Perfect for a weeknight when you're too hungry to cook. Popped in the oven covered with foil for 30 min at 375, and another 15 with the foil off. Cheesy. Yum.

Pasta for when I have time

After a fairly lazy childhood, I've developed a type A personality that makes it difficult to relax on weekends. I can watch HGTV and drink coffee til noon with the best of them, but at some point I need to do something productive.

My to-do list is never-ending, and somehow cleaning the house never bubbles to the top. There's something kind of freeing about spending the entire day in the kitchen when I should be finishing sewing projects or refinishing the garage sale finds cluttering Not Michael Landon's garage.

So I found myself last Sunday with a bunch of tomatoes passing their prime, and the will to turn them into something tasty. Our pathetic excuse for a summer had left me with enough for a decent meal-and-leftovers portion of sauce. As for a pasta, with a full day ahead I figured I could be ambitious and go for ravioli.

Not Michael Landon likes to make fun of my reliance on Joy, but I used it here as I usually do, for a reference rather than a recipe. I've had some trouble with fresh tomato sauces before, I usually burn them before I can get them to thicken. I thought about roasting them first, but with the mercury pushing 90 degrees inside (yeah, finally, after my vines have given up), turning on the oven didn't sound appealing. Joy had a grilled tomato sauce, much better idea.

I tossed the tomatoes with a little olive oil, salt & pepper, and after checking with Not Michael Landon that I'd turned the thing on properly (seriously, I need to cook meat more often), I just popped 'em right on the grill. I would recommend doing this over foil in hindsight. We have these neat stainless steel grates that kept the tomato juice from putting out the fire, but it made a heck of a mess. Another thing I could have done was peel the tomatoes, they ended up kinda stringy in the finished sauce. They would have popped right off after cooking.

I needed onion and garlic, and wasn't planning on cooking the sauce much once I was done on the grill, so I made a little foil pocket (also with oil, s&p) and stuck them on as well. They took longer than the tomatoes, but didn't need as much babysitting. As everything finished, I dropped it in the blender, and then took it inside to whiz up with more s&p, my usual spaghetti sauce spices (oregano, parsley, dried lemon peel, and a dash of nutmeg) and twice my usual ice cube of basil pesto. I thought more basil would add to the summery taste of fresh grilled tomatoes.

So, ravioli. I think it means "work" in Italian. Joy had boring ideas of meat filling, so I figured cheese would work. But even the cheese only called for ricotta and a smidgen of parm. At the grocery store, I checked out the ingredients list on a store-bought 4-cheese ravioli (ricotta, mozzarella, romano, parm), and came home with fontina, parm, romano, and asiago, in addition to whole milk for making ricotta. Go big or go home.

Ricotta is a cinch, but it takes for-ev-er to warm up, and needs constant babysitting. If you're not crazy, just buy the stuff, Martha's not watching. I mixed all the cheeses up with some egg and seasonings per-ish Joy, and then set on the long journey of making the pasta. I realized I hadn't even used my pasta roller since we moved, and boy how time made me forget how long it takes. By this time, I was getting hungry.

Luckily once the little pillows of cheesy goodness were made, we were at the home stretch. They needed to rest some, but the first ones I had made were ready by the time I finished. While they were boiling, I warmed up the sauce and then let them finish cooking a few minutes in it. I was so impatient by the end that I did undercook them a bit, but on the plus side, they make for perfect leftovers today at lunch.

Just about anything tastes wonderful after that long in the kitchen, but I was pleasantly surprised at how the filling flavor stood up to the bold sauce. Two cheeses. Pshaw, Joy.

Monday, July 12, 2010

Gardener of the Year

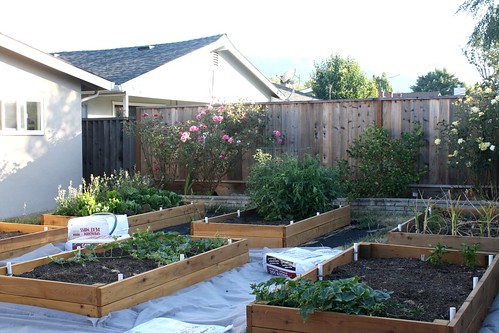
Remember that little plan we had to gradually increase our edible garden space, year by year? Baby steps prevent failure. Well, last year's one bed heard about the babies and had a few. There are now six.

It was actually a sprinkler problem that did us in; we just decided to devote a whole sprinkler zone (otherwise known as half our back lawn) to the endeavor. So, since I had all this space, I decided I must grow from seed, because I couldn't fill up nearly 200sf of garden space with $eedling$. And since I was buying seeds, I naturally bought 29 varieties, or $75 worth. On top of all the work - and money - of actually putting these beds in, filling them, hooking up an irrigation system, killing the grass around them all, and covering it with gravel.

Huh. Wonder why that didn't all work.

As you can see above, we're getting there.

What's not working:
  • The grass isn't all dead, nor all covered with weed block. Obviously the gravel isn't yet there. We didn't even get to re-waterproofing last year's bed.
  • What is there is extra soil parts we still haven't moved out of the way (but it holds the weed block down nicely, and makes an excellent doggie obstacle course).
  • Um, gardens don't typically have this much visible dirt in July. I've got at least 2.5 beds worth of space that's not filled at all.
  • Square foot gardening is kind of dumb when you don't fill up all the space. There are five tomato plants shoved into the back half of that far middle bed, and they're going to be a bitch to harvest.
  • Notice the bolting arugula in the far left back corner. Pretty though.
  • Those corn stalks on the right are actually ornamental, which I didn't notice until I brought them home. Also, it appears to be dying.
  • My turnips were eaten by rolly polleys, then the remaining bits rotted in the garage.
  • There's a hose draped over that giant bag of peat moss because we have no irrigation.
  • Everything you see here was grown from seedlings, unless you can make out the carrots behind the corn, or the potatoes in the ground behind that.
Phew, so is there anything that is working?
  • Five beds built & filled
  • Pretty much everything I planted from seedlings is doing beautifully. That's a cantaloupe at front left. Expect many recipes. The entire back left bed is lettuces & arugula, and it's awesome.
  • I did manage to get radishes, turnips, potatoes, and carrots to grow from seed. It's nothing I'm going to sell at the farmer's market, but I MADE FOOD.
  • There was plenty of laziness and outright unexplained failure involved in the seed starting, but I do feel like I learned some things I can use to improve next time. I still have plenty of seeds from my buy that are still good, and it's time to start things again for cool season crops.
And just this last Saturday, we had our most local meal yet, cooked on the grill and enjoyed al fresco on the back patio. Herb-roasted homegrown potatoes, salad (romaine, buttercrunch, marvel of four seasons, arugula, carrots and cucumber, all homegrown, with homemade vinaigrette), and Marin Sun Farms chicken, served with homebrewed British Bitter.

In true Not Laura Ingalls style, the cucumber tasted like ass and had to be picked out of the salad and fed to the dogs.

Friday, July 9, 2010

Proof that God loves us and wants us to be happy

In our never ending quest to spend less money, Not Michael Landon and I decided we could cut the alcohol budget. Not by drinking less, of course. By homebrewing.

I was raised a beer snob. I did the college thing of course, but at this point in my life I'm too old for Bud Light. I'll take water instead. But if there's a problem with good beer, it's that it's not cheap. Small batches, craftsmanship, and increasing grain prices can add up to a six pack for $9+. I've seen estimates that basically say if you drink the mass-produced big 3, skip it, but if you're into good beer, homebrewing will save money. I'll get into dollars later, but we've found this to be the case.

One of the (many) great things about homebrewing is it's naturally easy and uncomplicated. It's about drinking beer for pete's sake, it's not going to be rocket science. Brewing supply shops sell kits of equipment to get you started, as well as kits of ingredients with instructions. The simplest recipes are literally "boil a can of hopped, sugary goo for an hour".

On brewing day, we set up our turkey deep fryer, fill the pot with water, and steep some grain tea on the stove. Once we're boiling, pop in the grain tea and malt extract, and add hops at various points according to recipe. Boil for an hour, then cool down as quickly as possible. Siphon into the glass fermenter, add yeast, and leave it in the tub for a week or two.

On bottling day, we spend about a half hour washing and sanitizing bottles, then boil the bottling sugar, decant into bottles, and cap. Everything ages for another few weeks, and then we're ready to drink.

We buy mainly organic, quality ingredients, from a local co-op. We've tried a few more mainstream kits and found a difference in clarity, sediment and evenly tasty flavor. A kit of ingredients, adding yeast and bottle caps, will run $40-$66 with most around $42-$47. This is for a batch of 5 gal, from which we usually net just over 48 bottles. Math math, yada yada, that's $5.56/6pk or $11.12/12 pk. This usually beats even the best sale prices on decent 12 packs.

So... drinking. What are we drinking already?! We've tried a dark lager (lagers are trickier, and this was our first batch, so that shows just how easy the whole thing is), strong scotch ale, ESB, porter, British bitter, and we just bottled a red ale. I can't say there's one I wouldn't do again, and they've all changed slightly over the 2 cases, but if I had to pick a favorite, I'd probably go with the dark lager. Flavorful, malty, just enough hops.

If you're interested in learning more, check out http://www.breworganic.com/index.htm. There's tons of good info, and you can even buy all their products and equipment online. We're lucky to have them local to us, but considering beer is mostly water, even ordering online has a smaller carbon footprint that buying ready-made beer, unless it's very local.

Happy Brewing!

Wednesday, June 30, 2010

My Lunch Today...

...was dreampt up on a quick walk with the dogs.
...was put together in five minutes after we got back home and before I bolted out the door, and I really mean five minutes, not five Not Laura Ingalls minutes.
...is 100% local.
...is super yummy if I do say so myself.

Let's call it Smoked Brisket Pesto Panini with Fontina on Artisan Bread with side of Crudites. Sounds fancy for five minutes.

Ingredients
No, I didn't bake it myself. Baking bread is a lot easier and less time consuming than most people think, but honestly, it's just not first on my list every weekend. This stuff is tasty and local and doesn't require I turn my oven on in 90 degree heat.
  • Basil Pesto
I whipped this up last fall when the basil in my backyard garden had gone bonkers and I couldn't keep the flowers at bay any longer. I chopped it all off and stuck as many leaves as would fit in my blender along with about 1/4 cup of pine nuts (toasted dry on the stove while I picked the leaves), a few cloves of garlic, a healthy tablespoon of lemon juice, and enough olive oil and/or water to get the blender going. When it was all whirred up, I added enough Parmesan cheese and salt to get it to my liking, then poured it into ice cube trays and froze it. It's handy popped into a spaghetti sauce in the dead of winter when there's no fresh basil around, but today I stuck a cube in a sandwich bag and let it thaw until I could spread it on the bread at lunch.
  • Smoked beef brisket
I should tell you Not Michael Landon has developed quite the obsession with BBQ. About once a month or so, he'll order a piece of the grass-fed beef carcass that is delivered weekly to our grocery store (he's becoming legend with the butchers) and let it cook away all day in the Webber kettle he obtained for free off craigslist. Okay, there were non-free modifications, and it's a science that takes a bit of tinkering, but the point is this is another weekend cooking activity that we only have occasional time for like bread. Except meat keeps and freezes better, and if he's firing up the smoker, that thing is going to be loaded up with meat. This particular brisket was cooked at least a month ago.
  • Fontina cheese
From my favorite Clover Stornetta family farms. Melts beautifully.
  • Carrots and celery
Just chopped up on their own. I took a look at the hummus in the fridge, but it's no longer suitable for human consumption.

Directions
Before I headed out the door, I popped the meat & cheese on the bread, grabbed the cube of pesto, and chopped up the veggies. At work, I spread the pesto on one slice of the bread and toasted the whole thing, assembled, for maybe 5 minutes.

No fancy picture, no involved process. I've been purposefully absent for awhile because I can't ever find time to upload pictures and when I can, I feel like I should be spending it in the kitchen, making something actually blog-worthy. Today, a story about lead in kids' foods - and the ensuing interwebz cry of "Oh Noes, what will we feed our children that's not supplied by Del Monte or Earth's Best!" - reminded me that I didn't start this to share the fancy things I make from scratch, I did it to share the easy, real-life ones. Since I lamented about convenience foods not buying us time nearly a year ago, I really have (mostly) put down the Taco Bell, but I haven't been sharing it. Well, it's not homemade lasagna or pumpkin pie. It's a sandwich thrown together on a typical running-late-as-always Wednesday morning that keeps me from abusing my wallet and waistline at Chipotle a few hours later.

And now I'm full. Back to work.

Tuesday, January 26, 2010

Stock Tips

Not the Wall Street kind, but we're sort of talking about money. Done correctly, stock is free. Or at least, the cost is buried in your water and energy bills. It's kind of like compost - turning garbage into something yummy. Just a little more direct. I don't have a recipe to share, and a picture isn't very exciting, but this is how I make my stock.

1) Save anything yummy. Never throw away a bone, or any remnants of the holy trinity (onions, celery, carrots).

2) Freeze it. I keep a bag of miscellaneous bones in the freezer, and a separate bag of carrot and onion skins and ends, and celery tops, bottoms and hearts. Leeks often end up in there as well. This lets me use the scraps from several meals to make a stock, instead of throwing away rib bones here and there and waiting until we cook a whole chicken.

3) Consider how much of a purist you want to be. I toss all bones in together, and I don't pay attention to ratios of vegetables. Sometimes something that has been smoked ends up in there. If you want to make real separate chicken, beef, and vegetable stocks, you'll need to keep more bags in the freezer and obviously it will take longer to save up enough for a batch.

4) I'm going to skip ahead here a minute and chat about straining. In a word, it's a bitch. I've tried several methods and they all suck, mostly because it's really hard to pour a giant pot of liquid and gunk through anything. I've finally solved this problem, and I have to give credit to Not Michael Landon, as well as Reynolds. I'm not a product pimp, I'm not getting paid or freebies, and I'd gladly use something generic if I'd found it, but this little baby made my life a billionty times easier: http://www.reynoldsstuffingsacks.com/. So, instead of dumping your odds and ends in a pot, dump them in a stuffing sack, tie off, then shove them in a stock pot and cover with water. Or even better, store them in the stuffing sack in the freezer in the first place (inside another plastic bag, I wouldn't worry terribly about freezer burn, but let's not invite it).

5) Bring to a boil and simmer. How long? Eh, 'til it tastes good and you've got some time to put it away. I usually have it going at least overnight, usually until I get home the next day. Just on the lowest setting where you get a bubble or two now and then, enough to keep it from growing bacteria, but not send your energy bill through the roof. I have a flat-top electric stove, so I don't consider the risk of fire to be high, but if you do, or if you have a gas stove, you can always use a crock pot.

6) Taste. Be careful, this sucker's been boiling awhile. I don't add much seasoning or herbs to my stock because I like to leave it a blank canvas for when I'm actually cooking with it, but I will add a bit of salt just so the flavors come through enough to tell me it's done. It's done when it tastes like stock, not water.

7) Cool. This is tricky. We're about to put boiling liquid in the freezer, so it needs to cool down. Start by tossing the stuffing sacks; those bones are just holding heat. It's tough to cool down a large, hot stockpot, but that's also an easy container to ice down. My stockpot fits pretty well on ice in my dutch oven, but if you can poor it into smaller containers first that you can put on ice, that will work faster.

8) Pour into a muffin tin. This will give you nice little chunks that are a good volume for recipes, and also melt in a reasonable amount of time.

9) Be sure the tin has cooled to room temperature, then put it in the freezer. If you want a lean stock, cool it further in the refrigerator first, then skim the solidified fat off the tops.

10) Once frozen solid, pop the blocks out of the muffin tin, and store in a large plastic bag. This isn't super easy. A butter knife and a strong husband helps. My muffin tin is looking pretty beat up from the experience too; I'm thinking about picking up a cheapy just for this use. I'm not thinking Reynolds can save me here.

That's it. Takes a lot of time, but it's all passive, and it's really not rocket science. I think I burnt it once, but all things considered it's forgiving. Then use your little hockey pucks to your heart's content in soups, stews, casseroles, rice, or as extra encouragement for your canine picky-eater. The usual places.