 UPDATE: Not Michael Landon informs me that the screws we used are 3" #10 wood screws. Apparently that's very important. In case you were about to use dry wall anchors or something. See what I mean about ever the engineer?
 One of the things I was most excited about when we decided to buy a single family home was a vegetable garden. How prairie-like is that?! It's like pre-scratch. Backyard vegetable gardens are coming back in a big way (remember the Obamas are doing it too), they're as local as it gets, and done right can be super healthy and cheap.
Now don't tell Not Michael Landon this, 'cause I'm always trying to defend myself, but I have about the blackest thumb you'll ever meet. A very sad mountain of plants met their demise on the front step and kitchen windowsill of the Little Apartment. I've been helping my mom with her vegetable garden the last several years, and I can't say I've contributed much, even though I have plenty of strong opinions. She's rather happy she gets to do it her own way this year, although I'm pretty sure she misses my manual labor. So I'll be updating you with my progress, and I have all sorts of ideas (including a five year plan), but as my road to good intentions is often paved with spectacular failure, don't hold your breath for a Sunset magazine feature.
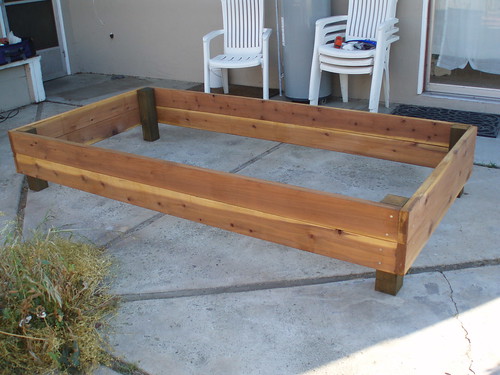
So onto step one - the raised bed. Raised beds are great for drainage, which apparently is important in growing plants or something, and better yet, they require you to bend over just a little bit less. My plans are loosely based on Square Foot Gardening , so I went for a 4 X 8 ft box. This lets me get to all the plants w/o compacting the soil by stepping into the bed and also minimizes the chopping-up of my lawn vs. two 4 X 4 boxes. We already get more veggies than we can eat from the CSA, so this first year I'm focusing on things we can preserve, mostly tomatoes, and starting small. As of right now, the plan is to build an additional box each of the next two years, and wean ourselves off the CSA completely.
We used these instructions from Sunset to plan and build the box. I left out the PVC pipe hoops because I haven't had issue with birds or cold in our area, and I can always attach them to the outside later. Since the materials were not exactly free, we needed a wood that would last awhile in the dirt and rain. Not Michael Landon, ever the engineer, has a tendency to Tim-the-Tool-Man-Taylor any project he's presented with, and as such he really wanted to use pressure treated wood. Despite a good effort in convincing me the nasty chemicals they use these days are not as bad as they used to be, I opted for redwood, which is naturally moisture and rot resistant. We still added nasty chemicals in the form of waterproofing, but at least it's dry to the touch. It wasn't recycled or reclaimed wood or anything like that (Not Michael Landon absolutely refused to use the remnants of our patio cover which are still sitting in a pile waiting for us to pay someone to take them away), but at least it's from California. Hippie home ownership involves all sorts of compromises.
It took almost as long for the two of us to put it together as it did to find someone at the hardware store to cut the boards for us. With waterproofing, it was about two hours total. And that's it up top all pretty (don't pretend you don't have a water heater just hanging out on your back patio, or half-assed curtains that don't reach the floor, and dead weeds all over, I know you're not that hoity toity).
Materials & Cost
First, a note. I have pro-rated all the materials for the various parts of this project, as this is all stuff we will use again, probably even if we never added another box. There is a little more up-front cost than I describe, but these are the true costs. In keeping with true costs, I also included tax. If you do not live where the Governator has just raised sales tax to an arm and a leg, you will see some savings. I have not included the cost of tools, even if we did buy them, as they will be used a billion times in the future - or at least they better be. For this stage, we used a drill and a paintbrush.
6 2" X 6" X 8' redwood boards : $54.14
1 4" X 4" X 8' pressure treated wood post, cut into 16" pieces: $10.89. Okay, okay, I let him talk me into this one. It was half the price of redwood. If this is the toxic influence that kills me, it's a cruel cruel world and I'll be telling God such shortly.
1 gallon Behr waterproofer: $3.05. We used maybe 1/6 of this gallon, this is the price of 1/5. It will last for the next two boxes, as well as an additional coat on the outside of the boxes each year for several years to come.
34 3" screws: $7.33. We used 32 and broke two.
Total: $75.41
Now don't tell Not Michael Landon this, 'cause I'm always trying to defend myself, but I have about the blackest thumb you'll ever meet. A very sad mountain of plants met their demise on the front step and kitchen windowsill of the Little Apartment. I've been helping my mom with her vegetable garden the last several years, and I can't say I've contributed much, even though I have plenty of strong opinions. She's rather happy she gets to do it her own way this year, although I'm pretty sure she misses my manual labor. So I'll be updating you with my progress, and I have all sorts of ideas (including a five year plan), but as my road to good intentions is often paved with spectacular failure, don't hold your breath for a Sunset magazine feature.
So onto step one - the raised bed. Raised beds are great for drainage, which apparently is important in growing plants or something, and better yet, they require you to bend over just a little bit less. My plans are loosely based on Square Foot Gardening , so I went for a 4 X 8 ft box. This lets me get to all the plants w/o compacting the soil by stepping into the bed and also minimizes the chopping-up of my lawn vs. two 4 X 4 boxes. We already get more veggies than we can eat from the CSA, so this first year I'm focusing on things we can preserve, mostly tomatoes, and starting small. As of right now, the plan is to build an additional box each of the next two years, and wean ourselves off the CSA completely.
We used these instructions from Sunset to plan and build the box. I left out the PVC pipe hoops because I haven't had issue with birds or cold in our area, and I can always attach them to the outside later. Since the materials were not exactly free, we needed a wood that would last awhile in the dirt and rain. Not Michael Landon, ever the engineer, has a tendency to Tim-the-Tool-Man-Taylor any project he's presented with, and as such he really wanted to use pressure treated wood. Despite a good effort in convincing me the nasty chemicals they use these days are not as bad as they used to be, I opted for redwood, which is naturally moisture and rot resistant. We still added nasty chemicals in the form of waterproofing, but at least it's dry to the touch. It wasn't recycled or reclaimed wood or anything like that (Not Michael Landon absolutely refused to use the remnants of our patio cover which are still sitting in a pile waiting for us to pay someone to take them away), but at least it's from California. Hippie home ownership involves all sorts of compromises.
It took almost as long for the two of us to put it together as it did to find someone at the hardware store to cut the boards for us. With waterproofing, it was about two hours total. And that's it up top all pretty (don't pretend you don't have a water heater just hanging out on your back patio, or half-assed curtains that don't reach the floor, and dead weeds all over, I know you're not that hoity toity).
Materials & Cost
First, a note. I have pro-rated all the materials for the various parts of this project, as this is all stuff we will use again, probably even if we never added another box. There is a little more up-front cost than I describe, but these are the true costs. In keeping with true costs, I also included tax. If you do not live where the Governator has just raised sales tax to an arm and a leg, you will see some savings. I have not included the cost of tools, even if we did buy them, as they will be used a billion times in the future - or at least they better be. For this stage, we used a drill and a paintbrush.
6 2" X 6" X 8' redwood boards : $54.14
1 4" X 4" X 8' pressure treated wood post, cut into 16" pieces: $10.89. Okay, okay, I let him talk me into this one. It was half the price of redwood. If this is the toxic influence that kills me, it's a cruel cruel world and I'll be telling God such shortly.
1 gallon Behr waterproofer: $3.05. We used maybe 1/6 of this gallon, this is the price of 1/5. It will last for the next two boxes, as well as an additional coat on the outside of the boxes each year for several years to come.
34 3" screws: $7.33. We used 32 and broke two.
Total: $75.41
