Wednesday, June 30, 2010

My Lunch Today...

...was dreampt up on a quick walk with the dogs.
...was put together in five minutes after we got back home and before I bolted out the door, and I really mean five minutes, not five Not Laura Ingalls minutes.
...is 100% local.
...is super yummy if I do say so myself.

Let's call it Smoked Brisket Pesto Panini with Fontina on Artisan Bread with side of Crudites. Sounds fancy for five minutes.

Ingredients
No, I didn't bake it myself. Baking bread is a lot easier and less time consuming than most people think, but honestly, it's just not first on my list every weekend. This stuff is tasty and local and doesn't require I turn my oven on in 90 degree heat.
  • Basil Pesto
I whipped this up last fall when the basil in my backyard garden had gone bonkers and I couldn't keep the flowers at bay any longer. I chopped it all off and stuck as many leaves as would fit in my blender along with about 1/4 cup of pine nuts (toasted dry on the stove while I picked the leaves), a few cloves of garlic, a healthy tablespoon of lemon juice, and enough olive oil and/or water to get the blender going. When it was all whirred up, I added enough Parmesan cheese and salt to get it to my liking, then poured it into ice cube trays and froze it. It's handy popped into a spaghetti sauce in the dead of winter when there's no fresh basil around, but today I stuck a cube in a sandwich bag and let it thaw until I could spread it on the bread at lunch.
  • Smoked beef brisket
I should tell you Not Michael Landon has developed quite the obsession with BBQ. About once a month or so, he'll order a piece of the grass-fed beef carcass that is delivered weekly to our grocery store (he's becoming legend with the butchers) and let it cook away all day in the Webber kettle he obtained for free off craigslist. Okay, there were non-free modifications, and it's a science that takes a bit of tinkering, but the point is this is another weekend cooking activity that we only have occasional time for like bread. Except meat keeps and freezes better, and if he's firing up the smoker, that thing is going to be loaded up with meat. This particular brisket was cooked at least a month ago.
  • Fontina cheese
From my favorite Clover Stornetta family farms. Melts beautifully.
  • Carrots and celery
Just chopped up on their own. I took a look at the hummus in the fridge, but it's no longer suitable for human consumption.

Directions
Before I headed out the door, I popped the meat & cheese on the bread, grabbed the cube of pesto, and chopped up the veggies. At work, I spread the pesto on one slice of the bread and toasted the whole thing, assembled, for maybe 5 minutes.

No fancy picture, no involved process. I've been purposefully absent for awhile because I can't ever find time to upload pictures and when I can, I feel like I should be spending it in the kitchen, making something actually blog-worthy. Today, a story about lead in kids' foods - and the ensuing interwebz cry of "Oh Noes, what will we feed our children that's not supplied by Del Monte or Earth's Best!" - reminded me that I didn't start this to share the fancy things I make from scratch, I did it to share the easy, real-life ones. Since I lamented about convenience foods not buying us time nearly a year ago, I really have (mostly) put down the Taco Bell, but I haven't been sharing it. Well, it's not homemade lasagna or pumpkin pie. It's a sandwich thrown together on a typical running-late-as-always Wednesday morning that keeps me from abusing my wallet and waistline at Chipotle a few hours later.

And now I'm full. Back to work.

Tuesday, January 26, 2010

Stock Tips

Not the Wall Street kind, but we're sort of talking about money. Done correctly, stock is free. Or at least, the cost is buried in your water and energy bills. It's kind of like compost - turning garbage into something yummy. Just a little more direct. I don't have a recipe to share, and a picture isn't very exciting, but this is how I make my stock.

1) Save anything yummy. Never throw away a bone, or any remnants of the holy trinity (onions, celery, carrots).

2) Freeze it. I keep a bag of miscellaneous bones in the freezer, and a separate bag of carrot and onion skins and ends, and celery tops, bottoms and hearts. Leeks often end up in there as well. This lets me use the scraps from several meals to make a stock, instead of throwing away rib bones here and there and waiting until we cook a whole chicken.

3) Consider how much of a purist you want to be. I toss all bones in together, and I don't pay attention to ratios of vegetables. Sometimes something that has been smoked ends up in there. If you want to make real separate chicken, beef, and vegetable stocks, you'll need to keep more bags in the freezer and obviously it will take longer to save up enough for a batch.

4) I'm going to skip ahead here a minute and chat about straining. In a word, it's a bitch. I've tried several methods and they all suck, mostly because it's really hard to pour a giant pot of liquid and gunk through anything. I've finally solved this problem, and I have to give credit to Not Michael Landon, as well as Reynolds. I'm not a product pimp, I'm not getting paid or freebies, and I'd gladly use something generic if I'd found it, but this little baby made my life a billionty times easier: http://www.reynoldsstuffingsacks.com/. So, instead of dumping your odds and ends in a pot, dump them in a stuffing sack, tie off, then shove them in a stock pot and cover with water. Or even better, store them in the stuffing sack in the freezer in the first place (inside another plastic bag, I wouldn't worry terribly about freezer burn, but let's not invite it).

5) Bring to a boil and simmer. How long? Eh, 'til it tastes good and you've got some time to put it away. I usually have it going at least overnight, usually until I get home the next day. Just on the lowest setting where you get a bubble or two now and then, enough to keep it from growing bacteria, but not send your energy bill through the roof. I have a flat-top electric stove, so I don't consider the risk of fire to be high, but if you do, or if you have a gas stove, you can always use a crock pot.

6) Taste. Be careful, this sucker's been boiling awhile. I don't add much seasoning or herbs to my stock because I like to leave it a blank canvas for when I'm actually cooking with it, but I will add a bit of salt just so the flavors come through enough to tell me it's done. It's done when it tastes like stock, not water.

7) Cool. This is tricky. We're about to put boiling liquid in the freezer, so it needs to cool down. Start by tossing the stuffing sacks; those bones are just holding heat. It's tough to cool down a large, hot stockpot, but that's also an easy container to ice down. My stockpot fits pretty well on ice in my dutch oven, but if you can poor it into smaller containers first that you can put on ice, that will work faster.

8) Pour into a muffin tin. This will give you nice little chunks that are a good volume for recipes, and also melt in a reasonable amount of time.

9) Be sure the tin has cooled to room temperature, then put it in the freezer. If you want a lean stock, cool it further in the refrigerator first, then skim the solidified fat off the tops.

10) Once frozen solid, pop the blocks out of the muffin tin, and store in a large plastic bag. This isn't super easy. A butter knife and a strong husband helps. My muffin tin is looking pretty beat up from the experience too; I'm thinking about picking up a cheapy just for this use. I'm not thinking Reynolds can save me here.

That's it. Takes a lot of time, but it's all passive, and it's really not rocket science. I think I burnt it once, but all things considered it's forgiving. Then use your little hockey pucks to your heart's content in soups, stews, casseroles, rice, or as extra encouragement for your canine picky-eater. The usual places.

Saturday, November 14, 2009

Olive Oil Bread

So here it is at long last. I've tried a handful of yeasted breads, and this is the only one I've really had success with. Sandwich bread turned out too dense. This actually has a texture approaching something you'd pay money for in the grocery store.

It starts out, not with Joy, but with Martha. I have a couple tweaks, but really the best is the addition of garlic and rosemary. They're not necessary by any means, but they take plain old bread to a really lovely place. If I haven't mentioned it already, you're almost always going to want to use less garlic than I do in just about any recipe. Unless you're afraid of vampires.

This is a great dinner bread, and goes well with something like pumpkin turkey chilli, or as a crostini for bruschetta with an abundance of summer tomatoes, but we've used it plenty for sandwiches. The shape usually turns out pretty flat, so they're long skinny sandwiches.

We keep two types of olive oil on hand - extra light, which comes in a giant vat from Costco and is used for cooking, and extra virgin, which we buy in a big tin container from the Italian grocery store, and is used for salad dressings. The olive oil is a big part of the flavor here, but it calls for a lot, so I strike a balance between cost and taste by using about half and half.

Olive Oil Bread with Garlic and Rosemary
adapted from Martha Stewart's Baking Handbook

Ingredients

3 3/4 tsp active dry yeast (less than 2 packets; open 2 and measure out)
1 1/2 lbs (4 1/2 cups) bread flour, plus more for dusting
2 scant cups lukewarm water
3/4 cup olive oil
1 tbsp salt
4-5 cloves garlic, minced, or to taste
1 tbsp chopped rosemary

Directions

1. Sprinkle the yeast over the warm water and let sit until dissolved.
2. Meanwhile, in the bowl of an electric mixer, weigh out the flour if you have a scale around. Martha says real bakers measure their flour by weight, not volume, and I think it's helpful with this recipe, which tends towards the wet side. I almost always have to add more flour than 4 1/2 cups.
3. Add the olive oil and water (with yeast) to the flour. Stir with a wooden spoon until incorporated, then cover with plastic wrap and let rise in a warm place until doubled in bulk, about one hour. I use a trick I learned from Joy for a rising cabinet: turn your oven on to 350 or so for one minute, then turn it off. It gets just warm but not hot, and will stay a consistent draft-free temperature better than a countertop.
4. Add the salt, garlic, and rosemary. Mix with the dough hook on low until incorporated, and then up the speed a bit until the dough starts to pull away from the sides. Then turn it out onto a well-floured surface and knead by hand a bit more. Don't be afraid to add flour here if necessary, I almost always do, and flour the board often. Most of the time I'm working with this dough, I'm fighting to keep it from sticking to the board and/or running off it.
5. Return the dough to an oiled bowl, cover again with oiled plastic wrap, and let rise until doubled in bulk, another hour or so.
6. Turn the dough out onto a well-floured work surface and fold into thirds one way, then the other. Turn over, cover with oiled plastic wrap, and let rest 15 minutes.
7. Here, Martha has a bit about a wooden peel and transfering back and forth, and I don't have a wooden peel, which is probably why I never quite get the shape right. I just shape it into a round on my board, by rotating it between cupped hands, and let it sit, covered, for another 30 minutes. At this point, it's time to preheat the oven to 450 degrees. Place a baking stone (or cookie sheet, or upside down jelly roll pan) as close to the floor of the oven as you can get.
8. Make four slashes on top of the loaf to form a square, and place on the baking stone or substitute. This is the part that's easiest with a peel, in large part due to the wet texture of the bread. I usually pick it up in as much of a round as I can manage, and plop it onto the stone as quickly as possible without letting any glop onto the floor of the oven and burn.
9. Bake for about 35 minutes, until crust is dark golden brown. Transfer to a wire rack to cool, then enjoy!

Tuesday, October 13, 2009

Pumpkin Turkey Chili

I really have been back in the kitchen, promise. I have all sorts of excuses why you haven't heard about it, as always, and I won't bore you with them, but the good news is they're actually good excuses, which means I really will be able to share more coming up. Including my famous olive oil bread I promised you like, oh, a year ago. And a postmortem on my garden experiment.

But before we get to that, let's start with what we ate with this latest batch of bread. This story starts with another pumpkin pie from pumpkins. By the way, my crust really hasn't improved in the past year. I was thwarted by the glazing once again. I'm going to ask my grandma about this, but I have a feeling she just doesn't glaze. I think I'm going to wait to glaze next time until after I've baked the weighted crust, just before I let it brown.

Anyways, I had a sugar pie pumpkin from my CSA box I needed to use and a free Sunday, but I wasn't sure how much puree this pumpkin would produce, so I got another at the farmer's market. I needed two cups of pumpkin for a pie. I ended up with nine. I made some muffins and froze the leftovers in 1 cup bags, but really, I shouldn't be eating enough sweets to use up 6 cups of pumpkin anytime soon.

So, when this chili popped up in my blog reader, I jumped at it. It didn't taste pumpkin-y at all, just earthy and slightly sweet. Best of all, it's only 389 calories for a hearty and comforting portion packed with veggies.

Pumpkin Turkey Chili
adapted from allrecipes.com

Ingredients
2 tbsp olive oil
1 cup chopped onion
1 cup chopped sweet peppers (bell or similar)
1 clove garlic, minced
1 lb ground turkey (go ahead and go for the dark meat, it's reflected in my low cal total)
1 1/2 tbsp chili powder
1/2 tbsp cumin
1 tbsp cinnamon
1 tbsp cocoa powder
dash nutmeg
salt & pepper to taste
1 4oz can minced green chilies, mild
1 14.5 oz can diced tomatoes
1 14.5 oz can red kidney beans (any other canned or dried soaked & boiled bean would work here)
2 cups pumpkin puree (canned or scooped from roasted pumpkins)

Directions
1. Heat oil in large skillet or French oven and saute salted onions and peppers until soft. Add garlic and saute on bed of onions and peppers so it doesn't burn.
2. Push the veggies to the sides and brown the turkey.
3. Add spices and stir to slightly toast. Be careful not to burn.
4. Add all the canned goodies and stir well.
5. Let simmer for a good half hour or as long as you want.
6. Serve with a good hunk of our old friend olive oil bread... coming soon (promise!)

Wednesday, July 15, 2009

Convenience

Can you believe all the great, from-scratch, healthy, sustainable, tasty food I've been cooking lately?! Amazing, I tell you, simply amazing. You may sit in awe of me.

Oh you didn't see it? Did I forget to share it with you?

Okay, okay, actually it was a whole lot of Taco Bell. We've made a big push over the last few months to really "finish" our new house, and since neither work nor our normal busy weekend schedule seems to likely to slow down to accomodate us, we've had lots of busy weeknights filled with painting and drilling and swapping out hardware until the dog lets us know it's time for his walk, which means it's 9:00 and we haven't eaten a bite. Oops.

Now, we've survived the apocalypse before. I know there were plenty of things I could have done to avoid the late night Taco Bell trips. One Friday I actually did manage to take an hour out of projects to whip up a couple pasta bakes that sustained us for nearly two weeks (one went in the freezer, e.coli averted). But I'm not going to lie. It's really hard to stay on top of it all in the middle of craziness, and even harder to just stop and get a handle on it in the first place.

All this eco-friendliness often laughs in the face of progress, and while I'm first to admit human progress is often less than brilliant, it's important to note once in awhile that we did come up with these "advances" for some kind of reason. All these modern conveniences from canned beans to Hamburger Helper are supposed to save time - and we've filled that extra time with other persuits. We can argue chicken or egg all we want, but the result is in 2009 we're left with all kinds of expectations. If we want to turn back to kitchen escapades like it's 1940, some other kind of time filler really does have to go. This is hard enough for a couple DINKs without a lot of mandatory responsibilities, but we're going to need some kind of innovation in thought or technology for the world to even be able to catch on, much less want to.

Sustainable Food makes the point that we're only afforded the time to even be concerned about things like sustainability precicely because our total efforts have been decluttered by things like convenience food. (This is a nest of quotes of like three different blogs; if it didn't make so great a point I'd spare you the horror)
Clarke: "In a paper published a couple weeks ago, Dr. Sherilyn McGregor of Keele University in Staffordshire points out that when environmentally sound living requires extra work, that work is usually 'women’s work.' ... What decisions are environmentalist citizens asked to make? Choosing the green laundry detergent and toilet paper and buying organic groceries. Carrying cloth bags to the supermarket. Using non-toxic cleansers. Adding corporate citizenship to one’s list of brand loyalty factors and schlepping the Seafood Buying Guide around. Sorting trash into the proper containers for recyclables, compost, and landfilling.

"Of course, we men carry all those containers to the curb, which perfectly balances the division of labor. But then you add Environmentalism 2.0 to the mix, and you have the Slow Food (read: hours spent in the kitchen) and Local Food (read: hours spent shopping) movements, and with that kind of scheduling pressure a woman likely wouldn’t even have enough time left in the day to type up her husband’s poetry."

Henderson: That's not random snark -- Clarke is specifically referring to poet Wendell Berry's anti-computer tirade of a few years back, in which he explained that his wife types his stuff on an old Royal typewriter. It's all very well, as Keele writes in her paper, to idealize participatory citizenship as in Athens of old. But "as feminists have noted, these Athenian citizens were freed for politics by the labour of foreigners, slaves, and women who were not granted the status of citizen. Citizenship, understood as being about active participation in the public sphere, is by definition a practice that depends on 'free time'; it is thus not designed for people with multiple roles and heavy loads of responsibility for productive and reproductive work." ...
So just as I'm feeling subjugated - and laughing at the idea of Not Michael Landon writing or dictating poetry - a little burst of optimism comes in the form of this UCLA study that says convenience foods aren't actually all that convenient after all. It's not a terribly diverse or large sample, but they concluded that heavy reliance on convenience foods saved only 10-12 minutes of hands-on cooking time and didn't save at all on total prep time.

Convenience food was instead used to make more "elaborate" meals, cater to individual kid tastes, and avoid making a grocery list beforehand. Really? I'll admit I have a rather simple palate and enjoy clean, uncluttered flavors, but if "elaborate" = HFCS and modified food startch, please, count me out. I can't particularly comment on picky child eaters, having never been responsible for ones well-being for any extended period of time, but Not Michael Landon has been accused of having a child's palate, we eat the same thing, and we're both alive. And if life is too complicated to make a grocery list before you go shopping, well, just stick to the same simple repetoire and/or hire a therapist.

So, I'm ready to stop making excuses and put down the Taco Bell. And it's a good thing, because too much of my CSA is going to waste, and my homegrown veggies are just starting to ripen. I'll give you a hint on step 1 - have a big party. It forces you to clean your house and leaves a bunch of quality leftovers. Change is much easier with a clean slate.

Monday, May 18, 2009

Little Garden in the Backyard: Part 3 - the plants

You mean we're actually growing things here? Amazingly enough all that prep work eventually leads us to real live plants. Growing from seed has its advantages - it's by far the least expensive method and gives you complete control throughout the life cycle. My five year plan definitely involves starting my own seeds, and maybe even harvesting my own for some varieties, but we're starting small here remember. Buying seedlings is far more foolproof. 

And here's where I get to pimp my local Master Gardeners. I'll let them explain who the heck they are for themselves, from the American Horticultural Society website where you can find your own local program: 
The Master Gardener program, conducted throughout the United States and Canada, is a two-part educational effort, in which avid gardeners are provided many hours of intense home horticulture training, and in return they "pay back" local university extension agents through volunteerism. Master Gardeners assist with garden lectures, exhibits, demonstrations, school and community gardening, phone diagnostic service, research, and many other projects.
I get a monthly e-newsletter from my local Master Gardeners program with all kinds of tips and tricks, and a schedule of workshops and classes which are mostly free. But by far the best thing they do is their annual plant sale. The seedlings are $3 each, which is a decent price to start with, and the proceeds all go back into the MG program. There are all kinds of different fun varieties available, the MGs themselves swarm the place with advice and answers, there are other vendors with all kinds of neat plants & garden products, and the day is filled with seminars and demos and more knowledge than you could hope to absorb. 

Tomatoes and peppers especially don't like cold ground, so I kept these seedlings right up next to the house for the couple weeks they were home, and brought them in the garage the couple nights we got near frost. I checked their moisture level nearly daily as they can dry up quickly with their small size, and watered them more than once a day during our heat wave of 90 degree + temps (Yes, the frost and record highs were within two weeks of each other. While I'm making baby steps, global climate change is catching up). They hung on bravely, but started loosing their patience. 

The whole idea of Square Foot Gardening is to plant things in square feet, instead of rows - it's a very complicated fancy name. If a plant is to be spaced 12" apart in a row, you would instead plant one in every square foot. If the spacing is 6" apart, you would plant 4 per square foot, and so on and so forth. Indeterminate (viney) tomatoes can be planted one per square foot; determinate (bushy, the kind you can grow in containers) one per 2 square ft. 

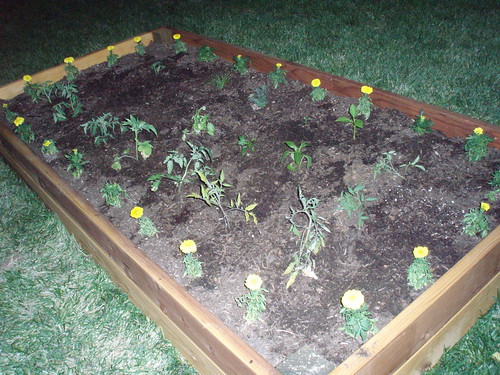
So, you're supposed to lay down this grid of wood or twine or something so you know where these square feet are, but did you see my pretty stained redwood box?! Well check this out - marigolds are an organic gardener's best friend. The yellow flowers are a natural repellent to all kinds of bugs, and they make a pretty little border. By planting a marigold every 12" around the border of my bed, I can roughly eyeball a square foot grid. Two birds, meet this one stone. Brilliant. You might notice in the picture at top that I couldn't bring myself to actually line everything up with the marigolds in exact square feet. It just looked so crowded, I couldn't imagine picking tomatoes off the grown vines. It's pretty close though; baby steps.

As for the actual planting, I did nothing fancy. I've got plenty of fertility in the soil, none needed in each hole. I just broke up the roots a bit and stuck 'em in. Tomatoes can use as many roots as they can get, and don't actually need much leaves, so I plant them deep, as much as 2/3 of the stem underground. Prick off the leaves you're burying and those stems will turn into especially nutrient-grabby roots. This picture is rather horrible (taking photos of dirt on dirt in the fading light isn't as easy as it sounds), but gives you a general idea. 

When it warms up some more, I'll be mulching the whole bed with a few inches of extra compost, but for now I dare say we're done. Time to sit back and wait for late summer magic. 

Seedlings: 
Tomatoes: I went for a wide variety here, but heavy on paste tomatoes that can be canned
    Paste - Sunset's Red Horizon (2), Mamma Mia (2)
    Beefsteak - Ernie's Round, Mariana's Peace
    Strawberry - Orange Russian
    Cherry - Sugary
    Green - Spear's Tennesse Green
Peppers: Gypsys are smaller and thinner than bells, the hot peppers will be used for salsa
    Sweet - Gypsy (2)
    Hot - Anaheim, Serrano
Lemon cucumbers: cute and yummy and fantastic for snacking, salads, or pickling
Herbs: 
    Sweet basil
    Cilantro
    Garlic chives
    Italian oregano: after planting I figured out this is a perennial; it may move to the flower beds in the fall

Materials & Cost

Planting took about one hour, and involved only a trowel. Most of the peppers and tomatoes were purchased at the Master Gardener's sale, and a lot of the rest was purchased from other vendors at the event. I picked up a couple things elsewhere and even got a couple tomatoes as gifts, but my rough total is $45.00 plus $11.00 for marigolds (I'd file this as pest control rather than seedlings). I'm not proud to say a number of seedlings fell victim to my black thumb just waiting to be planted; the cilantro that made it into the ground was no less than my third. This is an additional dimwit cost of about $16.00, and a recurring theme I need to get a handle on (you may remember tomato canning involved a similar dimwit fee, when I got so burnt out I never got around to preserving the peppers and basil I had bought as well). Remember seedlings are the only real recurring cost of the whole project, so I have to harvest about 23 lbs to break even assuming an average farmer's market price of $2/lb for local, organic produce. Stay tuned. 

Friday, May 15, 2009

Little Garden in the Backyard: Part 2 - the soil

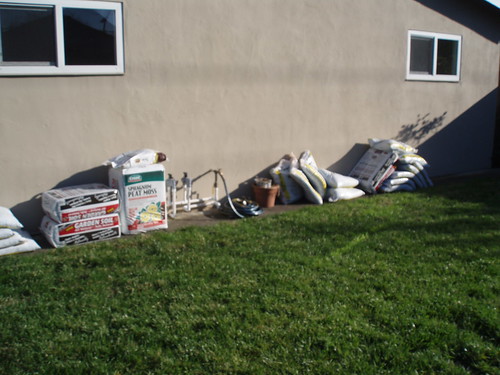
That's a whole ton of sh_t. Almost literally, really, the picture above is all the soil we bought for the vegetable garden, and it's mostly steer manure. If I can't grow something in this stuff, there is truly no hope for me. We used roughly equal parts garden soil and steer manure compost, and another half part peat moss. Square Foot Gardening recommends 1/3 compost, 1/3 peat moss and 1/3 vermiculite. Whatever vermiculite is, they didn't have it at OSH and I was in a hurry as usual. We even added in a little all-purpose organic fertilizer to the top layer.

Another plus to the raised bed, and a rather tall one at 12", is we don't have to worry about weeds or grass, especially crab grass, encroaching on the garden space. I did a flat bed with my mom's garden and we ended up digging a trench around and installing a wood border, this on top of all the digging we did to clear the bed in the first place. With this raised bed, we dug up about one whole square foot - just enough for the four posts to sit in the ground. We left the rest of the grass, it won't grow through 10" of soil, and will eventually break down to become nutrients for the veggies. The only drawback is I can't yet grow something with really deep roots like carrots, at least not yet.


We layered the ingredients in thirds and raked/mixed after each addition to make sure everything was well-incorporated. The end result is a porous, aerated, uber-nutrient-rich blank canvas ready to make yumminess. We got a late start, so we left planting the seedlings for another day, this gave the soil a chance to get some water and settle. For now we're watering it with the sprinkler right behind it in the corner there, but I won't want the tomatoes watered as often as the lawn once they really get going, so we'll have to figure something out.

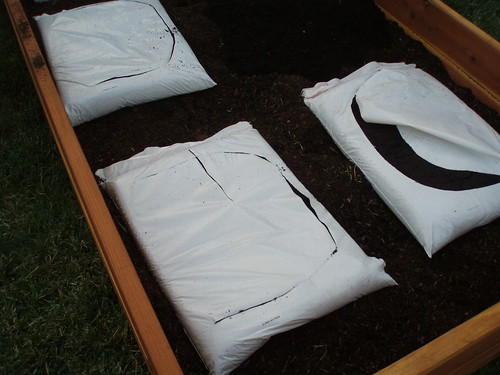
Now before I break down the costs, I have to share one last tip, and beg you to forgive the little woman nature of it. Growing up without a man in the house, there is a certain handiness to Not Michael Landon that continues to amaze me, five years after moving in together. When mom and I used bags of steer manure compost, we'd open them up potato-chip-bag style, usually with whatever was lying around like a trowel or a rake or just tear at them with our hands until they finally gave in. Then we'd flip them over and attempt to distribute each bag evenly over the entirety of the 8'X8' bed, which mostly resulted in the momentum of the bag swinging us around until the majority was in a big clump in one corner, and the rest scattered a bit here and there.

So imagine my wonder when Not Michael Landon evenly sets out six bags of compost in our garden bed, makes a big open U-shape on each with a utility knife, and dumps each over in its place, resulting in a nearly even layer of compost with almost no effort at all. I was speechless. He wondered how I hadn't died off on my own already. You're probably too smart to be as amazed as I was, but here's a picture just for funsies.

With digging the holes, dumping everything in, turning and raking, this stage took all of about an hour. We bought a lot more soil components than we needed, but it will all get used eventually, in the next bed if not in other places around the yards.

Materials & Cost

This was all on a no sales tax sale, whoopee! Tools used were a spade, large shovel, and small rake.

Steer manure blend: 12 cu feet, 12 bags at $1.09 each = $13.08

Garden soil: 10 cu feet, 3 1/3 bags at $8.99 each = $29.97

Sphagnum peat moss: 2.5 cu feet compressed, 2/3 bag at $15.49 each = $10.33

All purpose organic fertilizer: 3.5 cups of 20lb bag at $19.99 = $1.17

Total: $54.55

The box and the soil are really the start up costs of this garden. Next year will involve some added compost, fertilizer, and seedlings, but this soil and box will be used again. So the sum total for the installation itself is $129.96 and 6 man hours of labor.