This year, we're hoping not to be in a little apartment anymore sometime soon, which could make it as crazy as the year I decided to get married in January.
The easiest way to tackle all this would be to do less. But I really like it all. So my first strategy is an attitude adjustment. I simply do not let myself get frustrated and worn out doing it all. I'm not doing it for anyone other than me, so if I'm not having a good time, there's no point. Usually a firm reminder that I'm doing this for fun does the trick, but theoretically I could stop. (I can stop anytime I want to... right?)
My second strategy is to start early. Which is the catalyst for such an annoying post title on November 18th. My Christmas card supplies are purchased and photos chosen, and almost all my Christmas cookie dough is in the freezer (one more half batch to go). I've gone through all my addresses and identified the ones I need to update. My goal is to be well on my way to done with the crafty stuff by Thanksgiving.
This kinda ties into my third strategy - planning. I have a memo booklet with lists for cards, cookies, crafts, gifts, and addresses for all, as well as what I've done the last several years to keep from repeating. I'm supposed to stick this in my purse so I can work on it whenever I have a chance, but I need to move it to my iPhone, probably via my Zenbe lists ap. I also drew up a week by week schedule for now through the holiday. It isn't set in stone or excessively detailed, but it lets me plan out when I need to start things, when I need to finish, and avoid having too much going on at once.
The weather is still so nice here it's hard to get into the mood, but it's all worth it in the end.
Here are the cookies I have sitting in my freezer, all courtesy Martha Stewart:
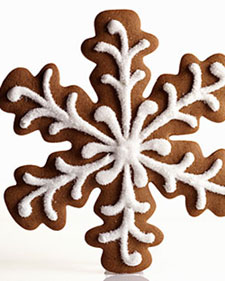 Gingerbread Snowflakes
These are so yummy and spicy and not overly sweet. There's something that just says Christmas about a cut-out cookie that you decorate, but I got kinda tired of plain old sugar. Martha wants you to make these giant snowflakes, but I just used the cutters I have - trees, snowflakes, and stockings. I cut them out, froze on a cookie sheet with parchment, and then transferred them to a plastic freezer bag.
Ingredients
- 6 cups all-purpose flour, plus more for work surface
- 1 teaspoon baking soda
- 1/2 teaspoon baking powder
- 1 cup (2 sticks) unsalted butter
- 1 cup packed dark-brown sugar
- 4 teaspoons ground ginger
- 4 teaspoons ground cinnamon
- 1 1/2 teaspoons ground cloves
- 1 teaspoon finely ground pepper
- 1 1/2 teaspoons coarse salt
- 2 large eggs
- 1 cup unsulfured molasses
- Royal Icing
- Fine sanding sugar, for sprinkling
- Sift together flour, baking soda, and baking powder into a large bowl. Set aside.
- Put butter and brown sugar in the bowl of an electric mixer fitted with the paddle attachment; mix on medium speed until fluffy. Mix in spices and salt, then eggs and molasses. Reduce speed to low. Add flour mixture; mix until just combined. Divide dough into thirds; wrap each in plastic. Refrigerate until cold, about 1 hour.
- Preheat oven to 350 degrees. Roll out dough on a lightly floured work surface to a 1/4-inch thick. Cut into snowflakes with a 7- inch snowflake-shape cookie cutter. Space 2 inches apart on baking sheets lined with parchment paper, and refrigerate until firm, about 15 minutes.
- Bake cookies until crisp but not dark, 12 to 14 minutes. Let cool on sheets on wire racks.
- Put icing in a pastry bag fitted with a small plain round tip (such as Ateco #7). Pipe designs on snowflakes; immediately sprinkle with sanding sugar. Let stand 5 minutes; tap off excess sugar. Let icing set completely at room temperature, about 1 hour. Store cookies between layers of parchment in an airtight container at room temperature up to 5 days.
 Chocolate Crackles
We've made these in my family forever, although we call them crinkles. I think this recipe is a little better, but don't tell my mom. I rolled the dough into balls and froze on a cookie sheet and transferred to a plastic freezer bag. I'll roll them in the sugar before I bake them off. Cross your fingers the sugar sticks.
Ingredients
Makes about 4 dozen
- 8 ounces bittersweet chocolate, melted and cooled
- 1 1/4 cups all-purpose flour
- 1/2 cup Dutch cocoa powder
- 2 teaspoons baking powder
- 1/4 teaspoon salt
- 8 tablespoons (1 stick) unsalted butter, room temperature
- 1 1/3 cups light-brown sugar, firmly packed
- 2 large eggs
- 1 teaspoon pure vanilla extract
- 1/3 cup milk
- 1 cup confectioners' sugar, plus more for rolling
- Heat oven to 350 degrees. Chop bittersweet chocolate into small bits, and melt over medium heat in a heat-proof bowl or the top of a double boiler set over a pan of simmering water. Set aside to cool. Sift together flour, cocoa, baking powder, and salt.
- In the bowl of a heavy-duty electric mixer fitted with the paddle attachment, beat butter and light-brown sugar until light and fluffy. Add eggs and vanilla, and beat until well combined. Add melted chocolate. With mixer on low speed, alternate adding dry ingredients and milk until just combined. Divide the dough into quarters, wrap with plastic wrap, and chill in the refrigerator until firm, about 2 hours.
- On a clean countertop, roll each portion of dough into a log approximately 16 inches long and 1 inch in diameter, using confectioners’ sugar to prevent sticking. Wrap logs in plastic wrap, and transfer to a baking sheet. Chill for 30 minutes. Cut each log into 1-inch pieces, and toss in confectioners’ sugar, a few at a time. Using your hands, roll the pieces into a ball shape. If any of the cocoa-colored dough is visible, roll dough in confectioners’ sugar again to coat completely. Place the cookies 2 inches apart on a Silpat-lined baking sheet. Bake until cookies have flattened and the sugar splits, 12 to15 minutes.
- Transfer from oven to a wire rack to let cool completely. Store in an airtight container for up to 1 week.
 Pine Nut Cookies
These are new for me, but the dough was pretty yummy and really simple even though I had to cut the egg in half to make it in two batches since I only have a small food processor. I couldn't get the pine nuts to stick very well, so I froze them w/o since they would just come off in the bag. Wish me luck that they stick better when I bake them off.
Ingredients
DirectionsMakes about 3 dozen
- 2 cups pine nuts
- 1 cup confectioners' sugar
- 1/4 cup almond paste
- 1 teaspoon pure vanilla extract
- 1 large egg
- 1/2 cup all-purpose flour
- 1/4 teaspoon baking powder
- 1/4 teaspoon salt
- Preheat oven to 350 degrees. Process 3/4 cup pine nuts, the sugar, almond paste, and vanilla in a food processor until fine crumbs form. Add egg; pulse to combine. Add flour, baking powder, and salt; process just until dough comes together.
- Roll dough into 3/4-inch balls. Roll balls in remaining 11/4 cups pine nuts, gently pressing to coat. Space 2 inches apart on parchment-lined baking sheets.
- Bake until cookies begin to turn golden brown, about 20 minutes. Let cool completely on sheets on wire racks.
2 comments:
I am totally in awe of your preparedness.
P.S. You've been tagged. Blame BB ;-)
Post a Comment